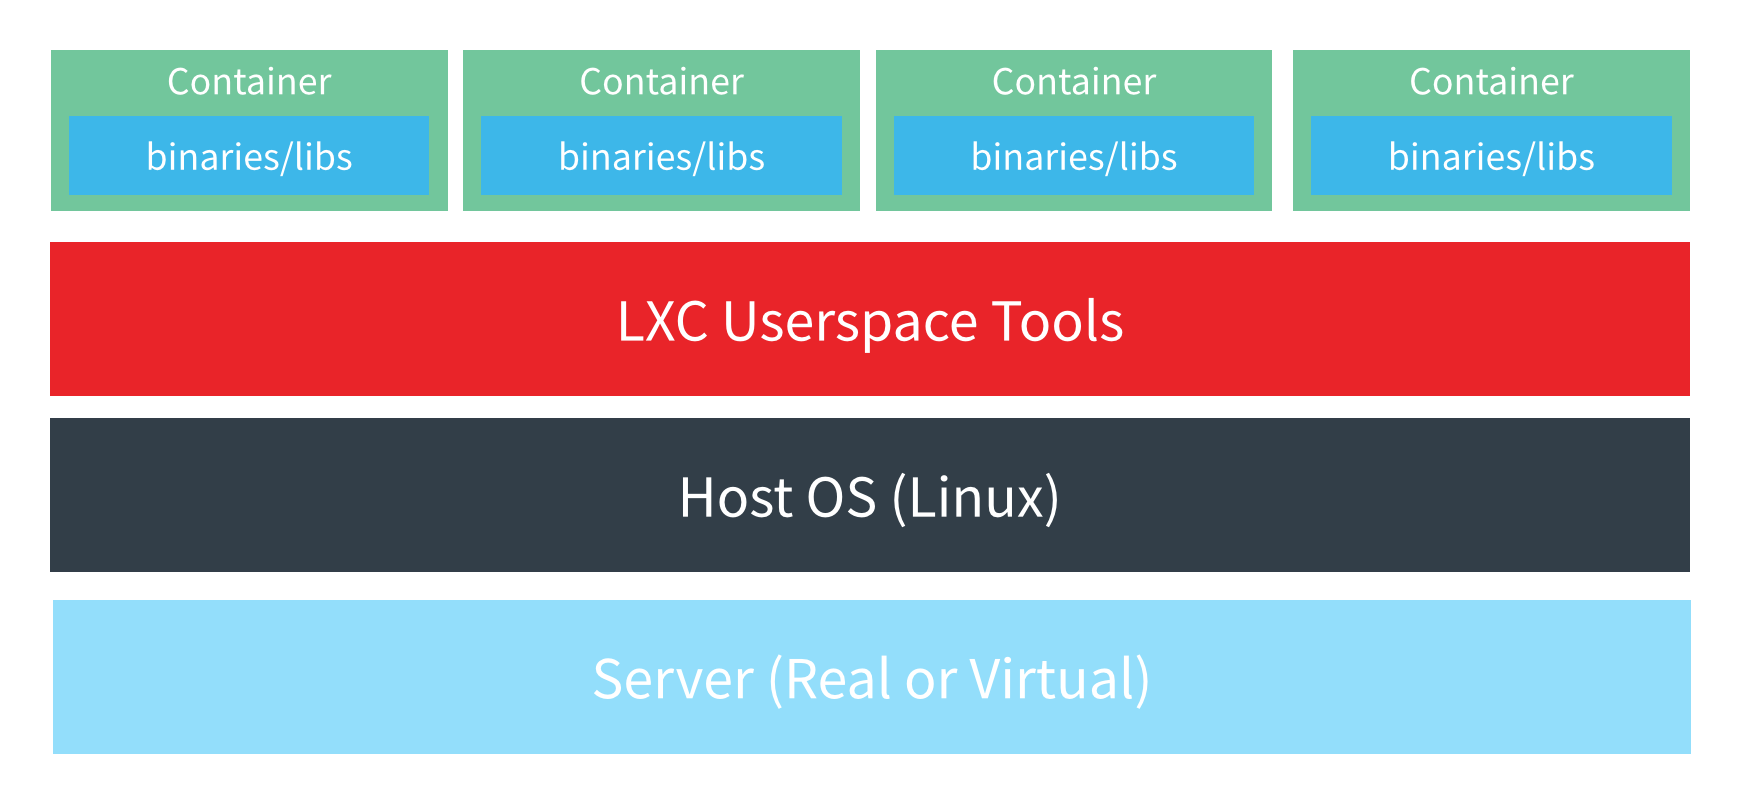
Linux Container (LXC) adalah suatu metode virutalisasi level sistem operasi linux untuk menjalankan beberapa sistem linux yang terisolasi pada satu host. pada dasarnya LXC ini sama seperti docker container hanya saja dari sisi fitur pasti berbeda.
jadi initnya kita dapat menjalankan berbagai OS linux dalam satu host container namun antar OS linux yang terinstall container tersebut saling terisolasi.
untuk menginstall LXC tidak begitu rumit, ayoo coba langsung…
install repo epel-release
|
1 |
yum install -y epel-release |
- sebelum menginstall LXC maka kita harus menginstall pendukungnya terlebih dahulu
|
1 |
yum install debootstrap perl libvirt -y |
kemudian setelah itu kita menginstall linux container dan templetenya
|
1 |
yum install lxc lxc-templates -y |
setelah itu aktifkan dan jalankan service lxc dan libvirtnya
|
1 2 |
systemctl enable lxc && systemctl enable libvirtd systemctl start lxc && systemctl start libvirtd |
cek status lxc kernel dengan lxc-checkconfig
|
1 2 3 4 5 6 7 8 9 10 11 12 13 14 15 16 17 18 19 20 21 22 23 24 25 26 27 28 29 30 31 32 33 34 35 36 37 38 39 40 41 42 43 44 45 46 |
[root@odl ~]# lxc-checkconfig Kernel configuration not found at /proc/config.gz; searching... Kernel configuration found at /boot/config-3.10.0-514.el7.x86_64 --- Namespaces --- Namespaces: enabled Utsname namespace: enabled Ipc namespace: enabled Pid namespace: enabled User namespace: enabled Network namespace: enabled Multiple /dev/pts instances: enabled --- Control groups --- Cgroup: enabled Cgroup clone_children flag: enabled Cgroup device: enabled Cgroup sched: enabled Cgroup cpu account: enabled Cgroup memory controller: enabled Cgroup cpuset: enabled --- Misc --- Veth pair device: enabled Macvlan: enabled Vlan: enabled Bridges: enabled Advanced netfilter: enabled CONFIG_NF_NAT_IPV4: enabled CONFIG_NF_NAT_IPV6: enabled CONFIG_IP_NF_TARGET_MASQUERADE: enabled CONFIG_IP6_NF_TARGET_MASQUERADE: enabled CONFIG_NETFILTER_XT_TARGET_CHECKSUM: enabled --- Checkpoint/Restore --- checkpoint restore: enabled CONFIG_FHANDLE: enabled CONFIG_EVENTFD: enabled CONFIG_EPOLL: enabled CONFIG_UNIX_DIAG: enabled CONFIG_INET_DIAG: enabled CONFIG_PACKET_DIAG: enabled CONFIG_NETLINK_DIAG: enabled File capabilities: enabled Note : Before booting a new kernel, you can check its configuration usage : CONFIG=/path/to/config /usr/bin/lxc-checkconfig |
STEP 2 – membuat dan mengatur LXC
pertama kita dapat melihat LXC container template yang sudah terinstall di host
|
1 2 3 4 5 6 7 8 9 10 11 12 13 14 15 16 17 18 19 |
[root@odl ~]# ls -l /usr/share/lxc/templates/ total 340 -rwxr-xr-x. 1 root root 10579 Des 3 14:09 lxc-alpine -rwxr-xr-x. 1 root root 13534 Des 3 14:09 lxc-altlinux -rwxr-xr-x. 1 root root 10839 Des 3 14:09 lxc-archlinux -rwxr-xr-x. 1 root root 9677 Des 3 14:09 lxc-busybox -rwxr-xr-x. 1 root root 29491 Des 3 14:09 lxc-centos -rwxr-xr-x. 1 root root 10486 Des 3 14:09 lxc-cirros -rwxr-xr-x. 1 root root 18306 Des 3 14:09 lxc-debian -rwxr-xr-x. 1 root root 17781 Des 3 14:09 lxc-download -rwxr-xr-x. 1 root root 49435 Des 3 14:09 lxc-fedora -rwxr-xr-x. 1 root root 28253 Des 3 14:09 lxc-gentoo -rwxr-xr-x. 1 root root 13962 Des 3 14:09 lxc-openmandriva -rwxr-xr-x. 1 root root 14046 Des 3 14:09 lxc-opensuse -rwxr-xr-x. 1 root root 35540 Des 3 14:09 lxc-oracle -rwxr-xr-x. 1 root root 12233 Des 3 14:09 lxc-plamo -rwxr-xr-x. 1 root root 6851 Des 3 14:09 lxc-sshd -rwxr-xr-x. 1 root root 23976 Des 3 14:09 lxc-ubuntu -rwxr-xr-x. 1 root root 11641 Des 3 14:09 lxc-ubuntu-cloud |
dari situ kita bisa mencoba container yang akan kita gunakan dengan format seperti ini
|
1 |
lxc-create -n nama_kontainer -t template_container |
langsung kita coba saja, menunakan image cirros
|
1 |
lxc-create -n vm1 -t cirros |
tunggu beberapa waktu nanti akan muncul seperti ini
|
1 2 3 4 5 6 7 8 9 10 11 12 13 14 15 |
instance-id: iid-local01 name: N/A availability-zone: N/A local-hostname: N/A launch-index: N/A === cirros: current=0.3.4 uptime=2548.49 === ____ ____ ____ / __/ __ ____ ____ / __ \/ __/ / /__ / // __// __// /_/ /\ \ \___//_//_/ /_/ \____/___/ http://cirros-cloud.net login as 'cirros' user. default password: 'cubswin:)'. use 'sudo' for root. cirros login: |
setelah itu kita coba login dan test koneksi ke internet
|
1 2 3 4 5 6 7 8 9 10 11 |
login as 'cirros' user. default password: 'cubswin:)'. use 'sudo' for root. cirros login: cirros Password: $ ping google.com PING google.com (45.121.219.21): 56 data bytes 64 bytes from 45.121.219.21: seq=0 ttl=57 time=7.612 ms 64 bytes from 45.121.219.21: seq=1 ttl=57 time=7.391 ms 64 bytes from 45.121.219.21: seq=2 ttl=57 time=8.186 ms --- google.com ping statistics --- 3 packets transmitted, 3 packets received, 0% packet loss round-trip min/avg/max = 7.391/7.729/8.186 ms |
jika ingin cloning vm di lxc bisa dengan cara seperti ini
|
1 2 |
[root@odl ~]# lxc-clone vm1 vm2 Created container vm2 as copy of vm1 |
semua container lxc yang kita buat berada pada direktori /var/lib/lxc
|
1 2 |
[root@odl ~]# ls /var/lib/lxc/ inst1 vm1 |
okee cukup sekian dulu untuk tutorial install dan managemen LXC pada centos, untuk selanjutnya saya akan mencoba unutk menghubungkan jaringan antar vm di lxc mengunakan openvswitch
wasalam…

Komentar