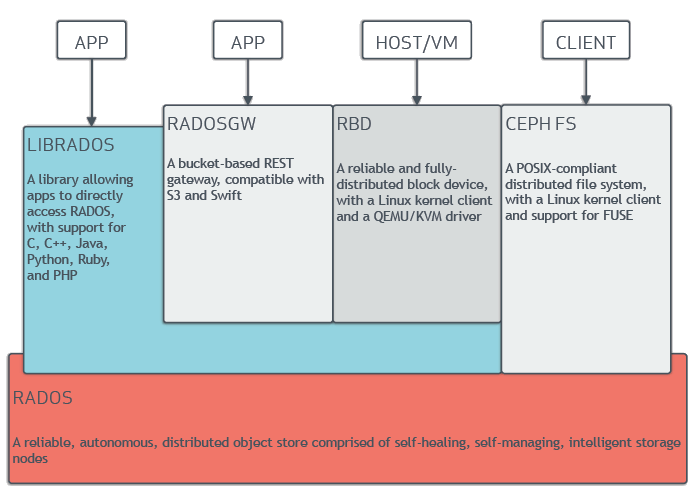
Ceph Storage adalah software open source yang di desain untuk menyediakan penyimpanan objek, block dan file yang sangat fleksibel.
Ceph Storage cluster dirancang untuk berjalan di atas hardware mengunakan algoritma CRUSH (Controlled Replication Under Scalable Hashing) untuk memastikan data didistribusikan secara merata di seluruh cluster dan semua node cluster dapat mengambil data dengan cepat tanpa hambatan terpusat.
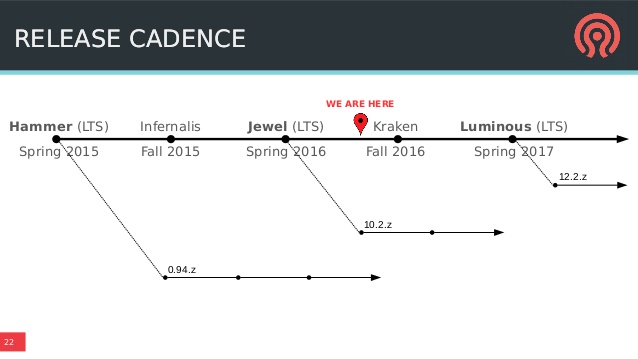
Ceph Release
Pada tutorial kali ini terdapat 3 server yaitu
- Ceph Monitor
- Ceph OSD0
- Ceph OSD1
Install Repo Pada semua server
|
1 2 3 4 5 6 7 |
yum install epel-release yum install wget -y yum -y install vim screen crudini wget http://download.ceph.com/rpm-jewel/el7/noarch/ceph-release-1-1.el7.noarch.rpm rpm -Uvh ceph-release-1-1.el7.noarch.rpm yum repolist yum -y update |
Setting NTP, Disable Firewall dan Disable Network Manager pada semua server
|
1 2 3 4 5 6 7 8 9 10 11 12 13 14 15 16 17 18 |
#NTP yum -y install chrony systemctl enable chronyd.service systemctl restart chronyd.service systemctl status chronyd.service #Firewall systemctl stop firewalld.service systemctl disable firewalld.service systemctl status firewalld.service #Networking systemctl disable NetworkManager.service systemctl stop NetworkManager.service systemctl status NetworkManager.service systemctl enable network.service systemctl restart network.service systemctl status network.service |
Setting hosts pada semua server
|
1 2 3 4 5 |
vi /etc/hosts 192.168.122.18 ceph-mon 192.168.122.248 ceph-osd0 192.168.122.251 ceph-osd1 |
Tambahkan User stack pada setiap server
|
1 2 3 4 5 6 7 8 9 10 11 12 |
cat << EOF >/etc/sudoers.d/stack stack ALL = (root) NOPASSWD:ALL Defaults:stack !requiretty EOF useradd -d /home/stack -m stack passwd stack chmod 0440 /etc/sudoers.d/stack setenforce 0 getenforce sed -i 's/SELINUX\=enforcing/SELINUX\=permissive/g' /etc/selinux/config cat /etc/selinux/config |
*Note : untuk installasi ceph tidak disarankan mengunakan user root, maka dari itu harus dibuatkan user selain root yang memiliki hak akses sudoer
Jalankan Pada server Ceph-Mon
|
1 2 |
[root@ceph-mon ~]# yum -y install http://mirror.centos.org/centos/7/os/x86_64/Packages/python-setuptools-0.9.8-7.el7.noarch.rpm [root@ceph-mon ~]# yum -y install ceph-deploy |
*note : Pastikan versi ceph-deploy-1.5.39-0.noarch
generate ssh key dari user stack ke semua server
|
1 2 3 4 5 |
[root@ceph-mon ~]# su - stack [stack@ceph-mon ~]$ ssh-keygen [stack@ceph-mon ~]$ ssh-copy-id -i ~/.ssh/id_rsa.pub 192.168.122.18 #mon [stack@ceph-mon ~]$ ssh-copy-id -i ~/.ssh/id_rsa.pub 192.168.122.248 #osd0 [stack@ceph-mon ~]$ ssh-copy-id -i ~/.ssh/id_rsa.pub 192.168.122.251 #osd1 |
edit file ssh user ceph-deploy
|
1 2 3 4 5 6 7 8 9 10 11 12 13 |
[stack@ceph-mon ~]$ vim ~/.ssh/config Host ceph-mon Hostname ceph-mon User stack Host ceph-osd0 Hostname ceph-osd0 User stack Host ceph-osd1 Hostname ceph-osd1 User stack [stack@ceph-mon ~]$ chmod 644 ~/.ssh/config [stack@ceph-mon ~]$ exit |
*masih di server ceph-mon
|
1 2 3 4 5 6 7 |
#login sebagi stack su - stack [stack@ceph-mon]$ mkdir os-ceph [stack@ceph-mon]$ cd os-ceph [stack@ceph-mon os-ceph]$ ceph-deploy new ceph-mon [stack@ceph-mon os-ceph]$ ls ceph.conf ceph-deploy-ceph.log ceph.mon.keyring |
Set jumlah replica 2 (sehingga data yang tersimpan pada cluster ceph akan di replica sebanyak 2)
|
1 2 3 4 |
echo "osd pool default size = 2" >> ceph.conf echo "osd pool default min size = 1" >> ceph.conf echo "osd crush chooseleaf type = 1" >> ceph.conf echo "osd journal size = 100" >> ceph.conf |
Install ceph mengunakan ceph-deploy
|
1 2 |
[stack@ceph-mon os-ceph]$ ceph-deploy install ceph-mon [stack@ceph-mon os-ceph]$ ceph-deploy install ceph-osd0 ceph-osd1 |
Membuat initial monitor
|
1 2 3 4 5 6 7 8 9 10 11 |
[stack@ceph-mon os-ceph]$ ceph-deploy mon create-initial [stack@ceph-mon os-ceph]$ ls -lh total 284K -rw-------. 1 stack stack 113 Apr 22 13:42 ceph.bootstrap-mds.keyring -rw-------. 1 stack stack 71 Apr 22 13:42 ceph.bootstrap-mgr.keyring -rw-------. 1 stack stack 113 Apr 22 13:42 ceph.bootstrap-osd.keyring -rw-------. 1 stack stack 113 Apr 22 13:42 ceph.bootstrap-rgw.keyring -rw-------. 1 stack stack 129 Apr 22 13:42 ceph.client.admin.keyring -rw-rw-r--. 1 stack stack 310 Apr 22 13:19 ceph.conf -rw-rw-r--. 1 stack stack 173K Apr 22 13:42 ceph-deploy-ceph.log -rw-------. 1 stack stack 73 Apr 22 13:19 ceph.mon.keyring |
Menambah OSD
|
1 2 3 4 5 6 7 8 9 10 11 12 13 14 15 16 17 18 |
[stack@ceph-mon os-ceph]$ ceph-deploy disk list ceph-osd0 ......dipotong..... [ceph-osd0][DEBUG ] /dev/vda : [ceph-osd0][DEBUG ] /dev/vda2 other, LVM2_member [ceph-osd0][DEBUG ] /dev/vda1 other, xfs, mounted on /boot [ceph-osd0][DEBUG ] /dev/vdb other, unknown [ceph-osd0][DEBUG ] /dev/vdc other, unknown [stack@ceph-mon os-ceph]$ ceph-deploy disk list ceph-osd1 ......dipotong..... [ceph-osd1][DEBUG ] /dev/vda : [ceph-osd1][DEBUG ] /dev/vda2 other, LVM2_member [ceph-osd1][DEBUG ] /dev/vda1 other, xfs, mounted on /boot [ceph-osd1][DEBUG ] /dev/vdb other, unknown [ceph-osd1][DEBUG ] /dev/vdc other, unknown [stack@ceph-mon os-ceph]$ ceph-deploy disk zap ceph-osd0:vdb ceph-osd0:vdc ceph-osd1:vdb ceph-osd1:vdc [stack@ceph-mon os-ceph]$ ceph-deploy osd create ceph-osd0:vdb ceph-osd0:vdc ceph-osd1:vdb ceph-osd1:vdc |
Copy konfigurasi dan key ke semua node
|
1 |
[stack@ceph-mon os-ceph]$ ceph-deploy admin ceph-mon ceph-osd0 ceph-osd1 |
Set permission
|
1 |
[stack@ceph-mon os-ceph]$ sudo chmod +r /etc/ceph/ceph.client.admin.keyring |
Verifikasi ceph
|
1 2 3 4 5 6 7 8 9 10 11 12 13 14 15 16 17 18 19 |
[stack@ceph-mon os-ceph]$ ceph health HEALTH_OK [stack@ceph-mon os-ceph]$ ceph df GLOBAL: SIZE AVAIL RAW USED %RAW USED 81475M 81341M 134M 0.16 POOLS: NAME ID USED %USED MAX AVAIL OBJECTS rbd 0 0 0 38632M 0 [stack@ceph-mon os-ceph]$ ceph status cluster bb816990-7e70-4c32-8b55-f368a1e9fc29 health HEALTH_OK monmap e1: 1 mons at {ceph-mon=192.168.122.18:6789/0} election epoch 3, quorum 0 ceph-mon osdmap e23: 4 osds: 4 up, 4 in flags sortbitwise,require_jewel_osds pgmap v40: 64 pgs, 1 pools, 0 bytes data, 0 objects 134 MB used, 81341 MB / 81475 MB avail 64 active+clean |
oke setelah kita cek ceph health statusnya Health_OK , itu artinya semua kondisi osd dapat berjalan dengan baik. secara installasi ceph sudah selesai dan sudah siap untuk digunakan untuk RGW, RBD dan cephFS
cukup sekian tutorial installasi ceph jewel di centos 7 semoga dapat memberikan manfaat 🙂
wassalamualaikum


Komentar