
Umumnya, server atau instance di AWS diakses menggunakan IP Public (atau hostname yang dipointing ke IP public). Namun selain menggunakan IP Public, kita juga dapat mengakses melalui private IP, namun untuk mengakses instance menggunakan IP private kita harus membuat tunnel terlebih dahulu ke network VPC di AWS. Tunnel-nya bisa menggunakan jalur dedicated line (AWS Direct Connect) atau menggunakan VPN.
Tutorial kali ini akan menjelaskan langkah-langkah membuat koneksi site-to-site VPN antara VPC di AWS dengan network diluar AWS menggunakan pfSense.
Topologi di bawah ini adalah contoh implementasi yang akan dibuat.
Agar kedua network dapat berkomunikasi, subnet antara kedua network tersebut tidak boleh overlap. Jika network memiliki CIDR yang overlap maka kamu harus ubah salah satunya agar tidak overlap. Pada tutorial ini, di office network diasumsikan memiliki subnet 192.168.0.0/24 dibelakang pfSense yang akan dihubungkan dengan AWS VPC 172.31.0.0/16. Saya tidak akan menjelaskan pembuatan AWS VPC di tutorial ini, jadi diasumsikan bahwa kamu sudah memiliki VPC, dan biasanya di tiap region AWS sudah membuatkan default VPC. Untuk keperluan pengetesan, saya sudah siapkan masing-masing VM/instance baik di office network maupun di AWS. Nantinya kita akan coba ping dari masing-masing VM untuk mengetahui apakah koneksi VPN berhasil atau tidak.
Okeh langsung mulai aja yuk ikutin tutorialnya di bawah ini :
Step 1. Create AWS Customer Gateway
- Dari AWS Management Console, masuk ke menu VPC.
- Di bagian VPN Connection, klik Customer Gateway
- Pilih Create Customer Gateway
- Masukkan nama Customer Gateway, dan di kolom IP Address masukkan IP Public / WAN dari pfSense.

Step 2. Create Virtual Private Gateway (VPG)
- Dari console AWS VPC, klik menu Virtual Private Gateways.
- Pilih Create Virtual Private Gateway
- Ketikkan nama VPG-nya, dan di pilihan ASN, pilih Amazon default ASN.

- Pilih VPG yang baru dibuat, lalu pilih menu Actions > Attach to VPC

- Pilih VPC AWS Anda yang ingin dikoneksikan ke network luar.

Step 3. Tambahkan Routing Table
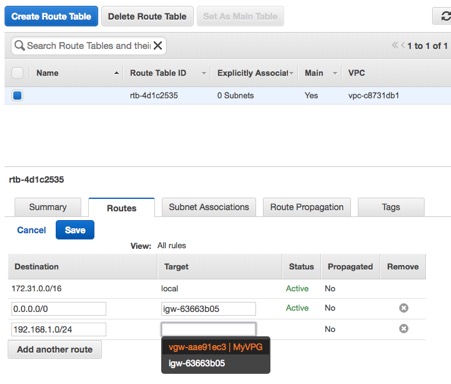
Agar VPC dapat berkomunikasi dengan network lain, maka perlu ditambahkan routing ke network tujuan. Sebenarnya saat VPN sudah established, biasanya network tujuan akan otomatis ditambahkan. Namun berdasarkan pengalaman saya, seringkali networknya tidak otomatis sehingga harus ditambah manual. Jadi agar amannya, lebih baik kita tambahkan saja routingnya dari awal secara manual.
- Dari console AWS VPC, klik menu Route Tables.
- Pilih VPC yang diinginkan, lalu klik tab Routes di bagian bawah.
- Klik menu Edit, lalu klik tombol Add another route
- Di bagian Destination, masukkan CIDR network office, dan dibagian Target pilih VPG yang sebelumnya dibuat. Jika sudah klik tombol Save.
Step 4. Create AWS VPN Connection
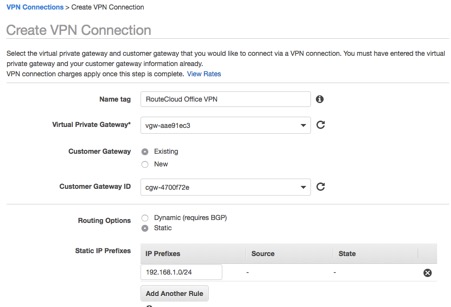
- Masih dari console AWS VPC, pilih menu VPN Connections
- Pilih Create VPN Connection
- Name tag : Masukkan nama koneksi VPN
- Virtual Private Gateway : Pilih VPG yang sebelumnya dibuat.
- Customer Gateway : Existing
- Customer Gateway ID : Pilih Customer Gateway yang sebelumnya dibuat
- Routing Options : Static
- Static IP Prefixes : Masukkan prefix network tujuanUntuk parameter lain biarkan default. Klik tombol Create VPN Connection di bagian bawah
- Tunggu beberpa saat sampai state profile VPN yang dibuat menjadi “Available”
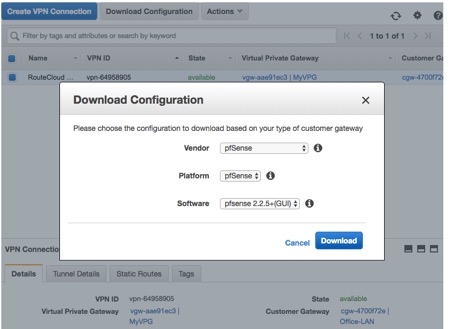
- Jika sudah available, Klik Download Configuration untuk mendownload konfigurasi VPN AWS tersebut.
- Vendor : Pilih pfSense
- Platform : pfSense
- Software : pfSense
Berikut adalah contoh isi file konfigurasi VPN AWS.
|
1 2 3 4 5 6 7 8 9 10 11 12 13 14 15 16 17 18 19 20 21 22 23 24 25 26 27 28 29 30 31 32 33 34 35 36 37 38 39 40 41 42 43 44 45 46 47 48 49 50 51 52 53 54 55 56 57 58 59 60 61 62 63 64 65 66 67 68 69 70 71 72 73 74 75 76 77 78 79 80 81 82 83 84 85 86 87 88 89 90 91 92 93 94 95 96 97 98 99 100 101 102 103 104 105 106 107 108 109 110 111 112 113 114 115 116 117 118 119 120 121 122 123 124 125 126 127 128 129 130 131 132 133 134 135 136 137 138 139 140 141 142 143 144 145 146 147 148 149 150 151 152 153 154 155 156 157 158 159 160 161 162 163 164 165 166 167 168 169 170 171 172 173 174 175 176 177 178 179 180 181 182 183 184 185 186 187 |
! Amazon Web Services ! Virtual Private Cloud ! AWS utilizes unique identifiers to manipulate the configuration of ! a VPN Connection. Each VPN Connection is assigned an identifier and is ! associated with two other identifiers, namely the ! Customer Gateway Identifier and Virtual Private Gateway Identifier. ! ! Your VPN Connection ID : vpn-53958932 ! Your Virtual Private Gateway ID : vgw-85e91eec ! Your Customer Gateway ID : cgw-0c00f765 ! ! ! This configuration consists of two tunnels. Both tunnels must be ! configured on your Customer Gateway for redundancy. ! ! -------------------------------------------------------------------------------- ! IPSec Tunnel #1 ! -------------------------------------------------------------------------------- ! #1: Internet Key Exchange (IKE) Configuration ! ! A policy is established for the supported ISAKMP encryption, authentication, Diffie-Hellman, lifetime, ! and key parameters.The IKE peer is configured with the supported IKE encryption, authentication, Diffie-Hellman, lifetime, and key ! parameters.Please note, these sample configurations are for the minimum requirement of AES128, SHA1, and DH Group 2. ! You will need to modify these sample configuration files to take advantage of AES256, SHA256, or other DH ! groups like 2, 14-18, 22, 23, and 24. ! Higher parameters are only available for VPNs of category "VPN," and not for "VPN-Classic". ! The address of the external interface for your customer gateway must be a static address. ! Your customer gateway may reside behind a device performing network address translation (NAT). To ! ensure that NAT traversal (NAT-T) can function, you must adjust your firewall ! rules to unblock UDP port 4500. If not behind NAT, we recommend disabling NAT-T. ! ! Go to VPN-->IPSec. Add a new Phase1 entry (click + button ) General information a. Disabled : uncheck b. Key Exchange version :V1 c. Internet Protocol : IPv4 d. Interface : WAN e. Remote Gateway: 52.6.19.127 f. Description: Amazon-IKE-vpn-53958932-0 Phase 1 proposal (Authentication) a. Authentication Method: Mutual PSK b. Negotiation mode : Main c. My identifier : My IP address d. Peer identifier : Peer IP address e. Pre-Shared Key: 5zo9St7h43QmA_ADXBwlxNPqWPH.CTCF Phase 1 proposal (Algorithms) a. Encryption algorithm : aes128 b. Hash algorithm : sha1 c. DH key group : 2 d. Lifetime : 28800 seconds Advanced Options a. Disable Rekey : uncheck b. Responder Only : uncheck c. NAT Traversal : Auto d. Deed Peer Detection : Enable DPD Delay between requesting peer acknowledgement : 10 seconds Number of consecutive failures allowed before disconnect : 3 retries ! #2: IPSec Configuration ! ! The IPSec transform set defines the encryption, authentication, and IPSec ! mode parameters. ! Please note, you may use these additionally supported IPSec parameters for encryption like AES256 and other DH groups like 2, 5, 14-18, 22, 23, and 24. ! Higher parameters are only available for VPNs of category "VPN," and not for "VPN-Classic". Expand the VPN configuration clicking in "+" and then create a new Phase2 entry as follows: a. Disabled :uncheck b. Mode : Tunnel c. Local Network : Type: LAN subnet Address : ! Enter your local network CIDR in the Address tab d. Remote Network : Type : Network Address : ! Enter your remote network CIDR in the Address tab e. Description : Amazon-IPSec-vpn-53958932-0 Phase 2 proposal (SA/Key Exchange) a. Protocol : ESP b. Encryption algorigthms :aes128 c. Hash algorithms : sha1 d. PFS key group : 2 e. Lifetime : 3600 seconds Advanced Options Automatically ping host : ! Provide the IP address of an EC2 instance in VPC that will respond to ICMP. ! -------------------------------------------------------------------------------- ! -------------------------------------------------------------------------------- ! IPSec Tunnel #2 ! -------------------------------------------------------------------------------- ! #1: Internet Key Exchange (IKE) Configuration ! ! A policy is established for the supported ISAKMP encryption, authentication, Diffie-Hellman, lifetime, ! and key parameters.The IKE peer is configured with the supported IKE encryption, authentication, Diffie-Hellman, lifetime, and key ! parameters.Please note, these sample configurations are for the minimum requirement of AES128, SHA1, and DH Group 2. ! You will need to modify these sample configuration files to take advantage of AES256, SHA256, or other DH ! groups like 2, 14-18, 22, 23, and 24. ! Higher parameters are only available for VPNs of category "VPN," and not for "VPN-Classic". ! The address of the external interface for your customer gateway must be a static address. ! Your customer gateway may reside behind a device performing network address translation (NAT). To ! ensure that NAT traversal (NAT-T) can function, you must adjust your firewall ! rules to unblock UDP port 4500. If not behind NAT, we recommend disabling NAT-T. ! ! Go to VPN-->IPSec. Add a new Phase1 entry (click + button ) General information a. Disabled : uncheck b. Key Exchange version :V1 c. Internet Protocol : IPv4 d. Interface : WAN e. Remote Gateway: 52.206.12.74 f. Description: Amazon-IKE-vpn-53958932-1 Phase 1 proposal (Authentication) a. Authentication Method: Mutual PSK b. Negotiation mode : Main c. My identifier : My IP address d. Peer identifier : Peer IP address e. Pre-Shared Key: E9brcI2yQVAQS31yu3brCs3HS.SGpucV Phase 1 proposal (Algorithms) a. Encryption algorithm : aes128 b. Hash algorithm : sha1 c. DH key group : 2 d. Lifetime : 28800 seconds Advanced Options a. Disable Rekey : uncheck b. Responder Only : uncheck c. NAT Traversal : Auto d. Deed Peer Detection : Enable DPD Delay between requesting peer acknowledgement : 10 seconds Number of consecutive failures allowed before disconnect : 3 retries ! #2: IPSec Configuration ! ! The IPSec transform set defines the encryption, authentication, and IPSec ! mode parameters. ! Please note, you may use these additionally supported IPSec parameters for encryption like AES256 and other DH groups like 2, 5, 14-18, 22, 23, and 24. ! Higher parameters are only available for VPNs of category "VPN," and not for "VPN-Classic". Expand the VPN configuration clicking in "+" and then create a new Phase2 entry as follows: a. Disabled :uncheck b. Mode : Tunnel c. Local Network : Type: LAN subnet Address : ! Enter your local network CIDR in the Address tab d. Remote Network : Type : Network Address : ! Enter your remote network CIDR in the Address tab e. Description : Amazon-IPSec-vpn-53958932-1 Phase 2 proposal (SA/Key Exchange) a. Protocol : ESP b. Encryption algorigthms :aes128 c. Hash algorithms : sha1 d. PFS key group : 2 e. Lifetime : 3600 seconds Advanced Options Automatically ping host : ! Provide the IP address of an EC2 instance in VPC that will respond to ICMP. ! -------------------------------------------------------------------------------- ! Additional Notes and Questions ! - Amazon Virtual Private Cloud Getting Started Guide: ! http://docs.amazonwebservices.com/AmazonVPC/latest/GettingStartedGuide ! - Amazon Virtual Private Cloud Network Administrator Guide: ! http://docs.amazonwebservices.com/AmazonVPC/latest/NetworkAdminGuide ! - XSL Version: 2009-07-15-1119716 |
File konfigurasi tersebut berisi beberapa informasi penting yang kita butuhkan untuk konfigurasi di sisi pfSense, seperti IP remote gateway AWS dan pre-shared key untuk Phase 1.
Step 5. Buat Konfigurasi IPsec di pfSense
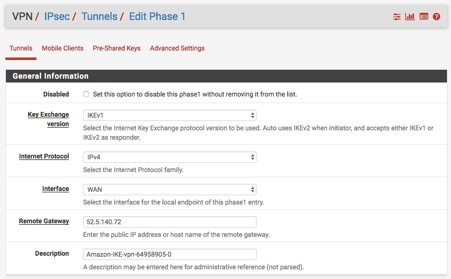
- Pilih web GUI pfSense, pilih menu VPN > IPsec
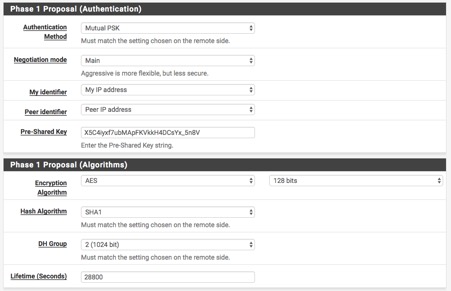
- Klik menu Add P1. Masukkan parameter seperti gambar di bawah ini.
Note : untuk kolom Remote Gateway dan Pre-Shared Key sesuaikan dengan yang ada di file konfigurasi yang sebelumnya didownload.
- Setelah disimpan, klik menu Show Phase 2 > Add P2 di konfigurasi Phase 1 yang sudah dibuat.
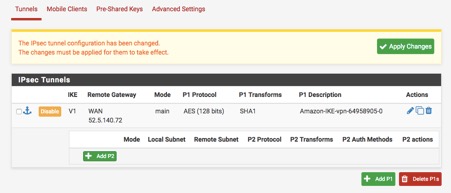
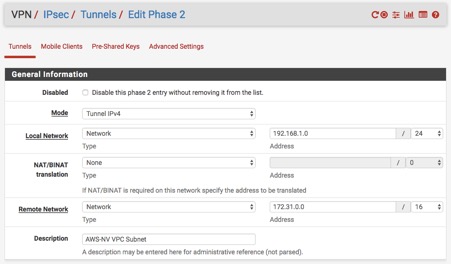
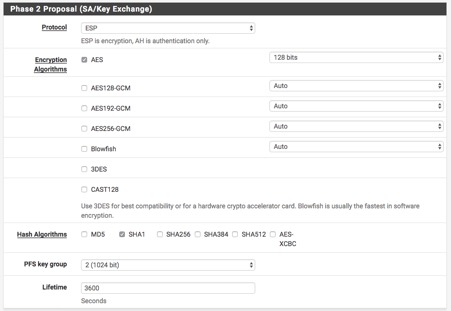
- Masukkan parameter Phase 2 seperti gambar di bawah ini.
- Untuk pilihan Local Network, kamu juga bisa memilih “LAN Network”. Namun berdasarkan pengalaman, beberapa kali routing tidak tembus padahal status IPsec sudah established. Jadi saran saya sebaiknya pilih Network dan masukkan subnet LAN manual.
- Untuk pilihan Remote Network, masukkan CIDR AWS VPC kamu.
- Untuk bagian Automatically Ping Host, kamu bisa masukkan IP instance AWS kamu, namun bisa juga kamu kosongkan karena ini optional.

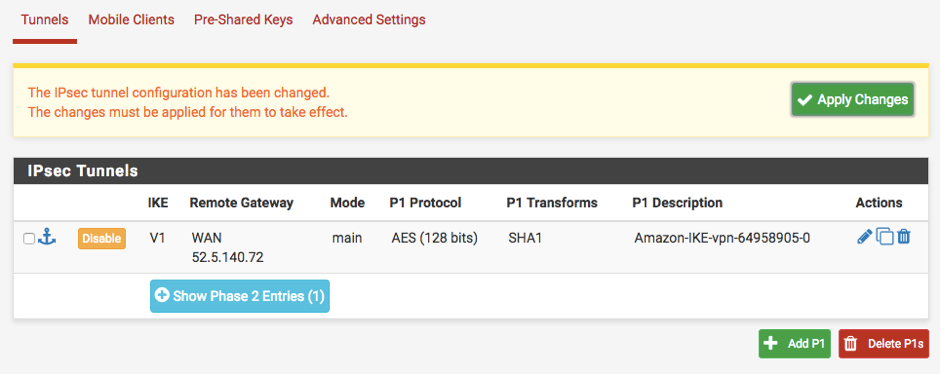
- Klik menu Apply Changes untuk menyimpan konfigurasi IPSec

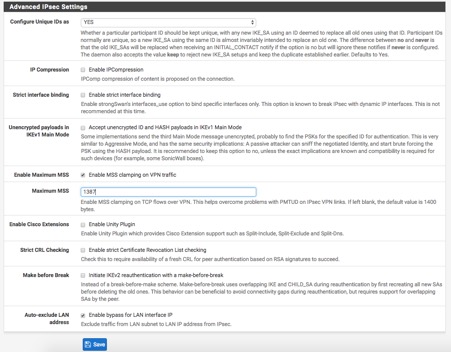
- Tambahan : Berdasarkan beberapa dokumentasi yang saya baca, ada parameter tambahan yang dapat diubah untuk meningkatkan reliability IPsec, yaitu MSS. Untuk mengubah parameter MSS, klik tab Advanced Settings, lalu masukkan angka 1387 di kolom Maximum MSS.
Step 5. Start pfSense IPsec Service for AWS
- Dari web GUI pfSense, pilih menu Status > IPsec
- Pilih konfigurasi IPsec yang sebelumnya dibuat, lalu klik pilihan Connect VPN.

- Jika koneksi berhasil, maka status IPsec akan berubah menjadi ESTABLISHED seperti gambar di bawah ini.

- Status VPN di AWS juga akan berubah menjadi UP.

Note : Saya pernah beberapa mengalami kasus dimana status IPsec di pfSense sudah established namun di AWS masih DOWN. Jika hal ini terjadi, pastikan konfigurasi Phase 1 dan Phase 2 sudah benar terutama di bagian LOCAL dan REMOTE network.
Step 6. Create Firewall Rule
Meskipun network sudah terhubung, kita masih harus menambahkan rule firewall agar traffic yang diinginkan dapat lewat. Firewall rule ini harus dibuat baik disisi pfSense maupun di AWS Security Group. Di tutorial ini saya tidak akan menjelaskan cara konfigurasi AWS Security Group melainkan hanya firewall rule di pfSense saja.
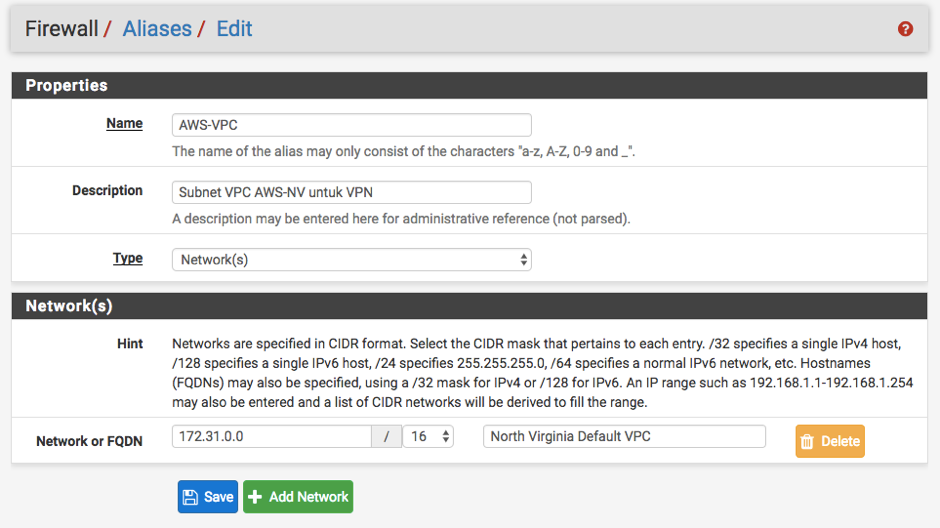
- Pilih menu Firewall > Aliases.
Disini saya menggunakan alias firewall agar memudahkan penamaan dan agar lebih mudah mengingat rule tersebut. Ketikkan nama serta Network VPC AWS seperti contoh di gambar berikut ini :
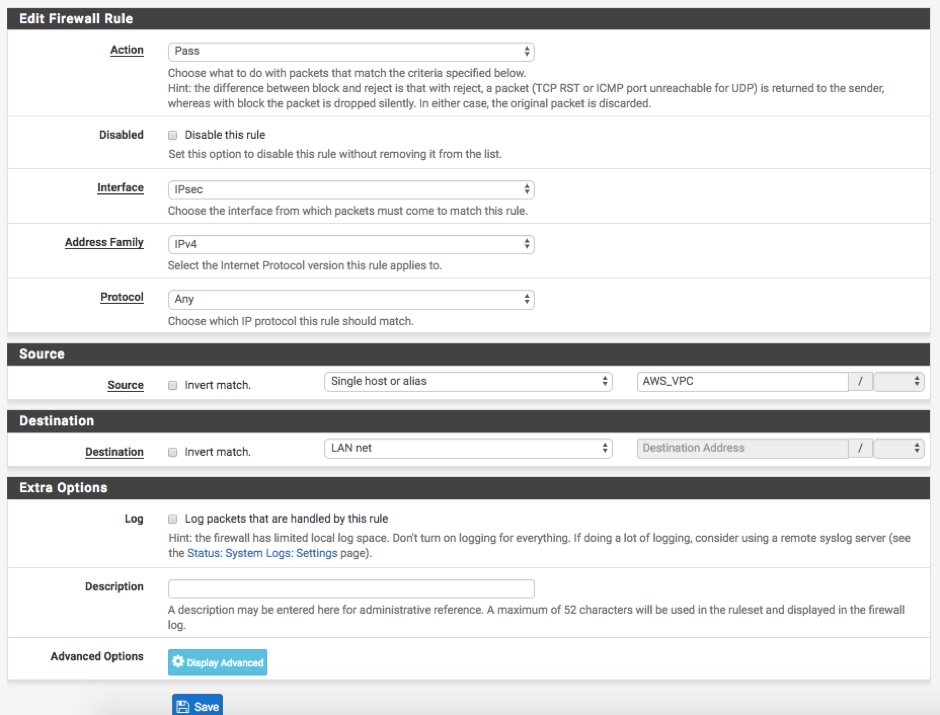
- Tambahkan rule IPSec melalui menu Firewall > Rules > IPsec. Klik tombol Add
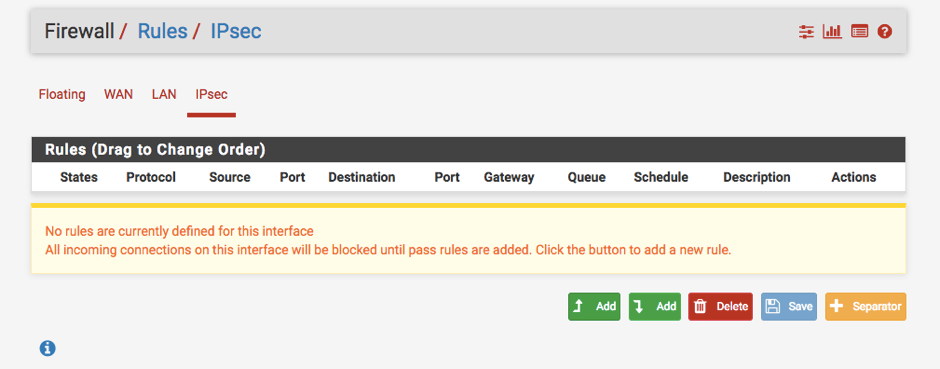
- Silahkan atur firewall sesuai kebutuhan. Disini saya akan melewatkan (Pass) semua protocol baik dari network AWS ke subnet LAN, oleh karena itu Action kita pilih Pass dan Source ketikkan network VPC AWS atau masukkan nama alias yang sudah dibuat sebelumnya. Untuk Destination pilih LAN.
Step 6. Testing Connection
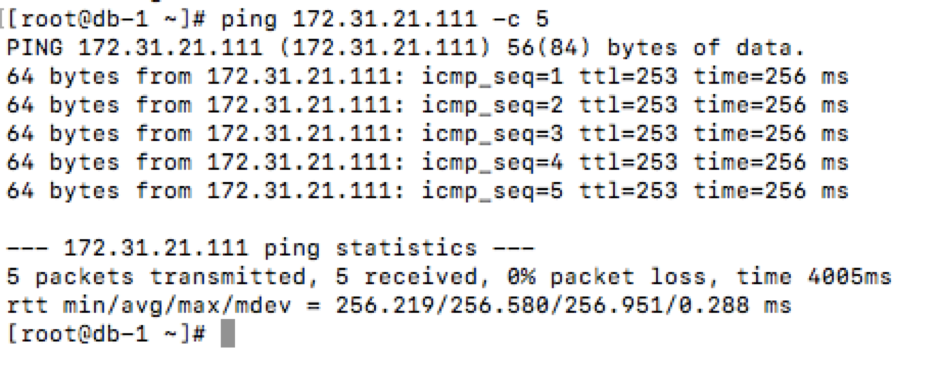
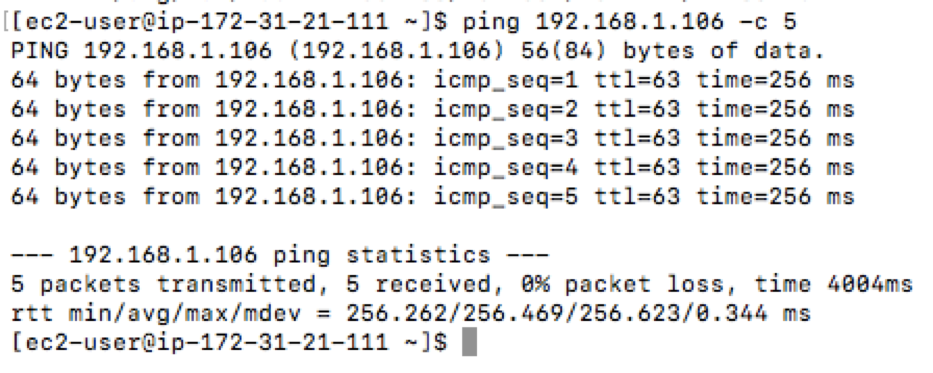
Untuk memastikan bahwa koneksi VPN sudah berhasil dan traffic sudah tembus, kita coba lakukan Ping dari server di Local LAN ke server di AWS dan sebaliknya menggunakan IP private masing-masing server.
Selamat!! Networknya sudah konek brooo…..
Note :
Biar gak kaget kalau ada tagihan VPN yang besar, sedikit informasi saja kalau untuk koneksi VPN di AWS, customer akan dikenakan tarif sebagai berikut :
- $0.05 per VPN Connection per hour
- Standard AWS data transfer

Komentar